Squarespace Forms: How to Set Them Up + Important Features
If you currently use Squarespace to host your website (regardless of what type of business you run,) Squarespace forms are a fantastic option for connecting with potential clients and customers easily and securely.
My favorite things about using forms over simply providing an email address to which info can be sent are:
You can control exactly what information gets sent to you in a form, so nothing is forgotten (such as name, email, potential dates to work together, etc…)
If your business is just starting out, you don’t have to give out a personal email or put an unbranded (@gmail.com, @yahoo.com, etc…) on your website while still communicating with customers.
Today, I’m detailing exactly what Squarespace forms are and how to use them, as well as answering some frequently asked questions about them and their abilities.
What is a Squarespace form block?
If you aren’t familiar with Squarespace or its templates, it’s helpful to know that everything you add to your website - from images, to text, to forms - are added by adding a “block” containing them. This is simply a section of the page that will include said image, text, form, etc…
Therefore, a Squarespace form block is just what it sounds like - a “block” or section on a page of your website which displays a form.
Visitors to your website can then fill out and submit said form, delivering the info collected right to your email address.
Ways to Use Squarespace Forms
There are limitless uses for Squarespace forms, but here are some of my personal favorites, as well as some great ideas I’ve seen on other websites!
Podcast Submissions and Pitches
If you run a podcast, embedding a Squarespace form block on your website in order to manage all podcast-related communications, such as submissions, pitches, collaboration, inquiries, etc… is a great way to give interested parties an easy way to contact you.
A form provides interested interviewees, etc… with a structured message template to send you, eliminating some of the intimidation and confusion that can come with a cold email.
Speaking Requests
If you offer speaking events, such as at conferences or schools, you can dedicate an entire page to your speaking gigs, including a form where you can be contacted regarding new opportunities.
In your form, you can create custom spaces for required info which otherwise might be awkward to ask for over email, such as compensation for your time, as well as important details like location, dates, etc…
Inquiries for Specific Services Listed on your Website
As a business owner, it’s a real possibility that you offer not just one, but many different services, programs, or products, as well as the opportunity for custom projects.
Creating a form where interested visitors can inquire about specific offers or introduce new project ideas is a great way to connect with them easily, professionally, and in a time-efficient way.
Waitlist Info for Programs such as Masterminds
If someone is interested in joining a waitlist for one of your programs, such as a mastermind, Squarespace forms are a great way to collect all the necessary info from them to ensure they receive a spot on the list and feel confident that they are in the qeue.
Rather than them having to send you an email asking if there is a waiting list, and, if so, how to join it, they can simply sign up for the waiting list via an easy form and save you both time in communication. After all, it should never be HARD for someone to sign up to work with you or take your courses!
General Inquiries/Introductions on Contact Pages
You can also use a Squarespace form block on your website’s contact page for general inquiries and client introductions. They are easy and minimal for people to fill out, and show up immediately right in your inbox.
This way, you can get back to them quickly, and keep a record of their message in your email account.
Client Questionnaires
Lastly, if your services require extensive customization or personalization (such as if you’re a website designer, like me!) you can create a Squarespace form block on your website to collect info about new projects without having to send your clients a list of questions over email.
How to Create a Form on Squarespace
If you’ve decided it’s time to add a form (or several!) to your website, you’re in the right place!
Here’s all the info on how to add Squarespace forms to any page on your website, quickly and easily:
1. Navigate to the section you want to add the form, and click on the edit button
This might look different depending on whether you’re using Squarespace 7.0 or 7.1
2. Hover on the middle of the page until you find the + icon or insert point
3. Click the + icon and then choose “forms”
A popup box will appear, and you’ll see forms on the right hand side.
4. Edit the settings
Content
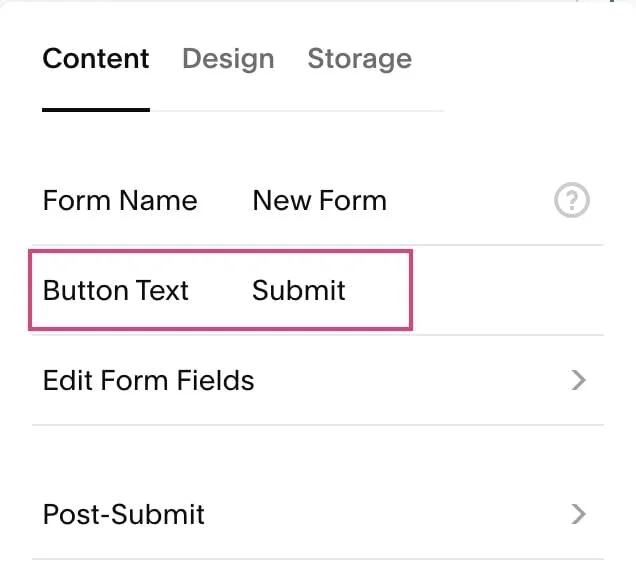
Form name: This is what will appear when you receive an email once someone has submitted the form. It’s best practice to name the form after the page it appears on or for what purposes the form serves. For example, “contact page form” or “collaborations form.”
Button text: This is the text that appears at the bottom of the form. It will default to “submit” but you can change it to something fun like “I’m in!” or “Put me on the list!”
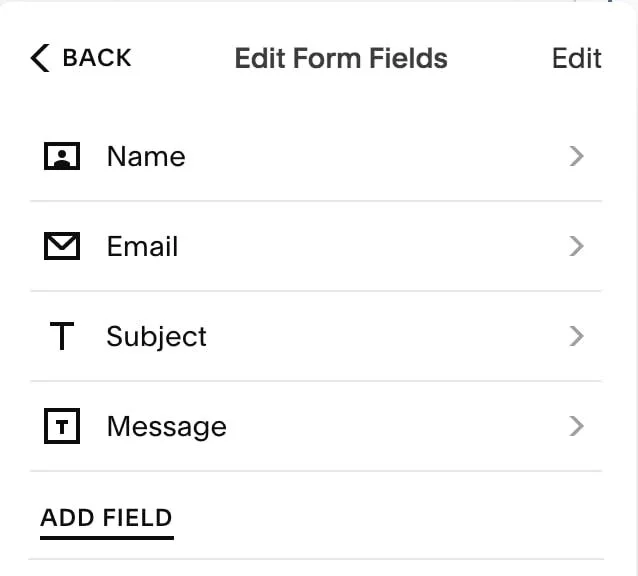
Edit form fields: This is where you can add fields to the form and rearrange the order.
Post submit: You can change the default message (“thank you”) that appears when someone clicks on the button to submit the form. You can also redirect a user to another page, such as a custom thank you page or next steps page.
Design
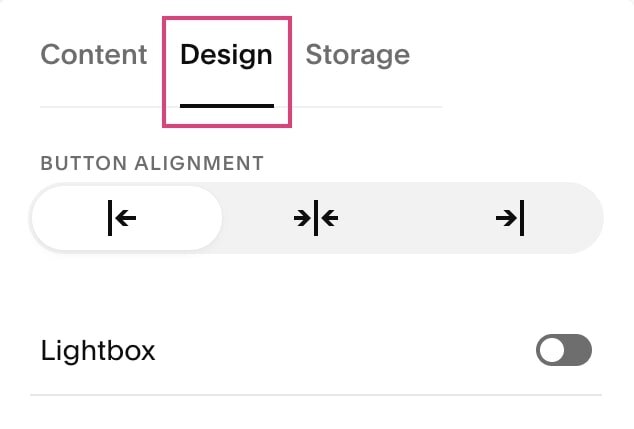
This is where you can change the alignment of the block or turn it into a lightbox, which means that the form will appear when a user clicks on a button.
How to Change Squarespace Form Contact Email
In the event you need to change which email address your form submissions are sent to, doing so is super easy. Whether you’re switching email addresses or outsourcing to a virtual assistant to handle email communications, here is how you can make the switch quickly:
Under the storage tab, you will see the option to change where the forms go. You can simply change the email by clicking on the email area and enter the new email address.
You can also connect Mailchimp and Google Drive to your forms. If you want to connect another platform that you don’t see here, that’s when you can use Zapier. Zapier is a tool that connects two platforms that don’t have a direct integration.
FAQs
Does Squarespace store form submissions?
No! Squarespace does not store your form submissions for security reasons, but all submissions are sent to your email inbox where they can be saved or archived for reference later.
Can I see which form someone submitted on my website in my email inbox?
Yes. You can give each form a unique title, which will show up in the subject line in the email when it’s sent to you.
Is there a limit to how many forms can be embedded on one website?
If there is, I haven’t heard of anyone reaching it! Many of my colleagues and clients use several different Squarespace forms on their website - and, as a Squarespace website designer, I know that Squarespace is equipped to handle and manage many at once.
If you’re looking for a Squarespace and Showit website designer to handle all the building, designing, and setup for you, good news! I do just that.
In order to learn more about working with me, start by visiting my services page below. I’ll see you there!
You might also love these Squarespace blog posts…


